Making of a reprogrammable DS cartridge
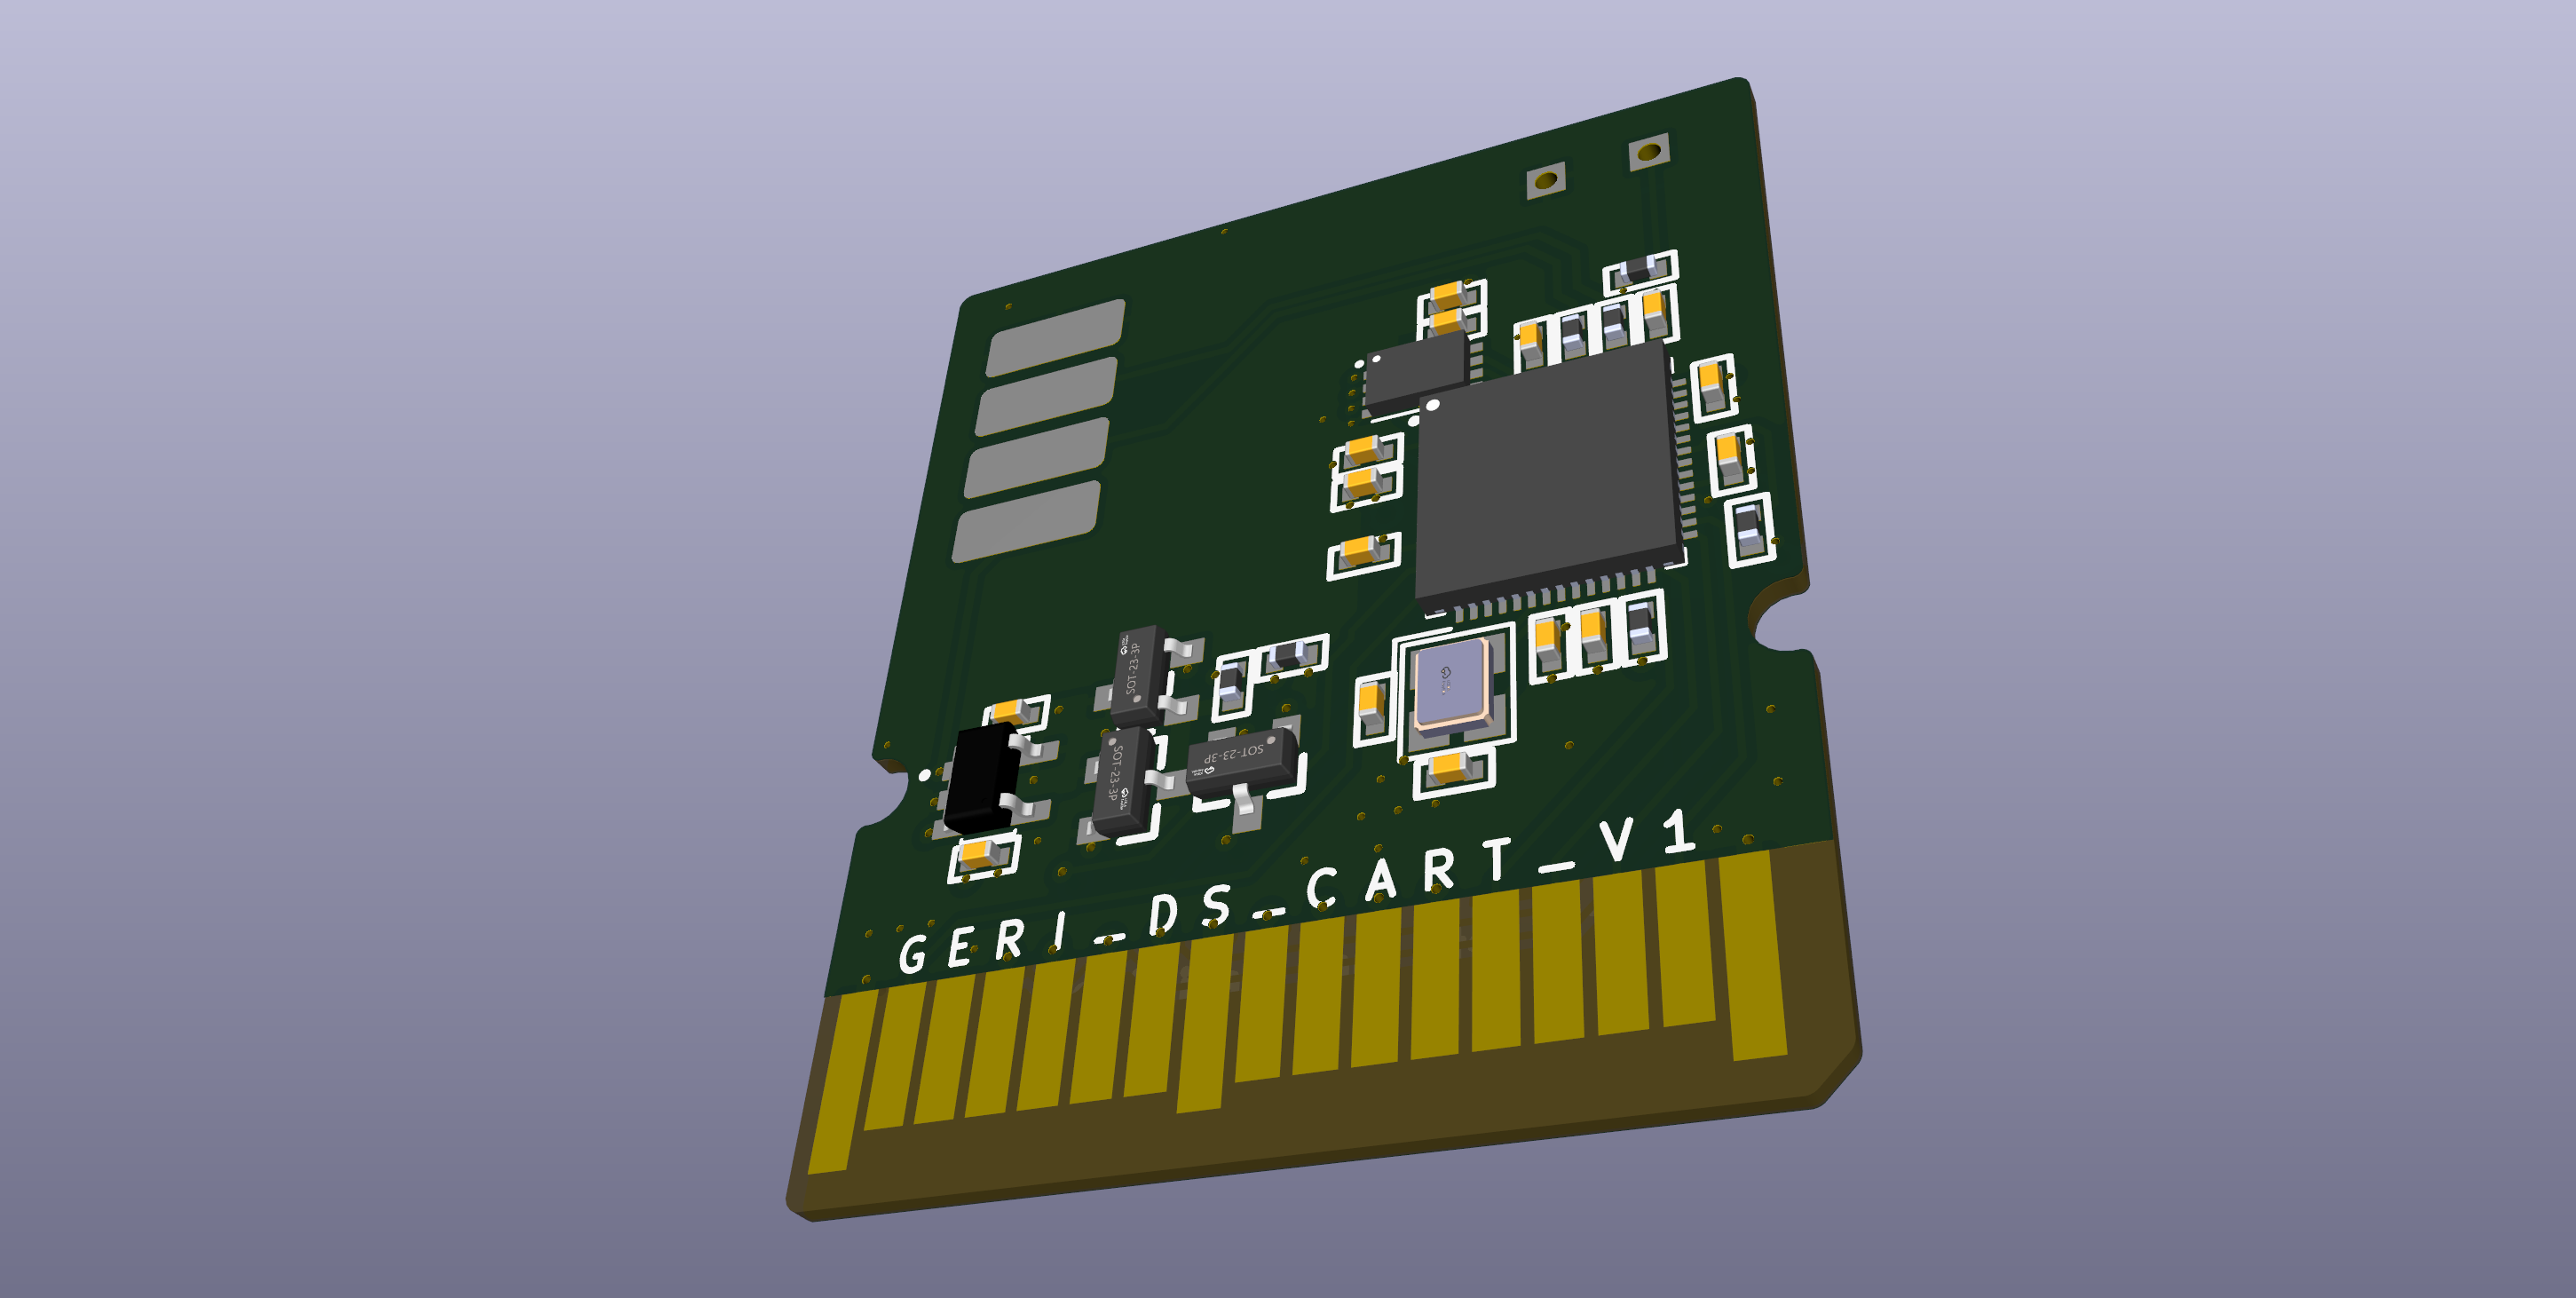
Alright, it’s about time for someone to make a repro for the DS, so here I am with this proof of concept.
This post is also available in Hackaday, I’d appriciate if you could give me some support there.
The homebrew scene for retro consoles is known for their distribution methods, where usually the developers create reproductions of the original distribution media and insert their games inside.
Even though this has existed for a variety of systems (such as the Sega Mega Drive) for a while, this sort of distribution hasn’t existed for the Nintendo DS. It’s true that the R4 and EZ-Flash have existed for a while, but these have a different goal than a reprogrammable cartridge would have.
A couple of months ago I stumbled across LNH-team’s work; they had built the DSpico, a flash cartridge (like the R4 or EZ-Flash), but this time being open source. By making this open source, they enable people to create modifications of the cartridge in order to add or (in my case) remove features. This is what gave me the idea to build a reprogrammable cartridge that would work on the DS.
In this post I’m going to summarize this project, from its conception to its conclusion, but it should also serve you as a guide on how to replicate it so you can make your own DS cartridges.
The rough idea
As I explained, the starting point for this project was the DSpico project itself. A repro cartridge only needs the internal memory and nothing more (no microSD). Meaning that in this case the hardware side of the project should be to remove both the microSD and microUSB ports from the cartridge, as well as adding a way to insert the ROM in the cartridge.
Also, on the software side, the DSpico’s bootloader, which contains the code to open the microSD ROM launcher, should also be able to be replaced by the custom ROM we want to run, which thankfully they already include a guide on how to do that. Although I’ll add some notes about this later in this post.
All in all, the rough idea is this: simplifying the hardware and replacing the software. So let me start the project progress.
Making the cartridge’s hardware
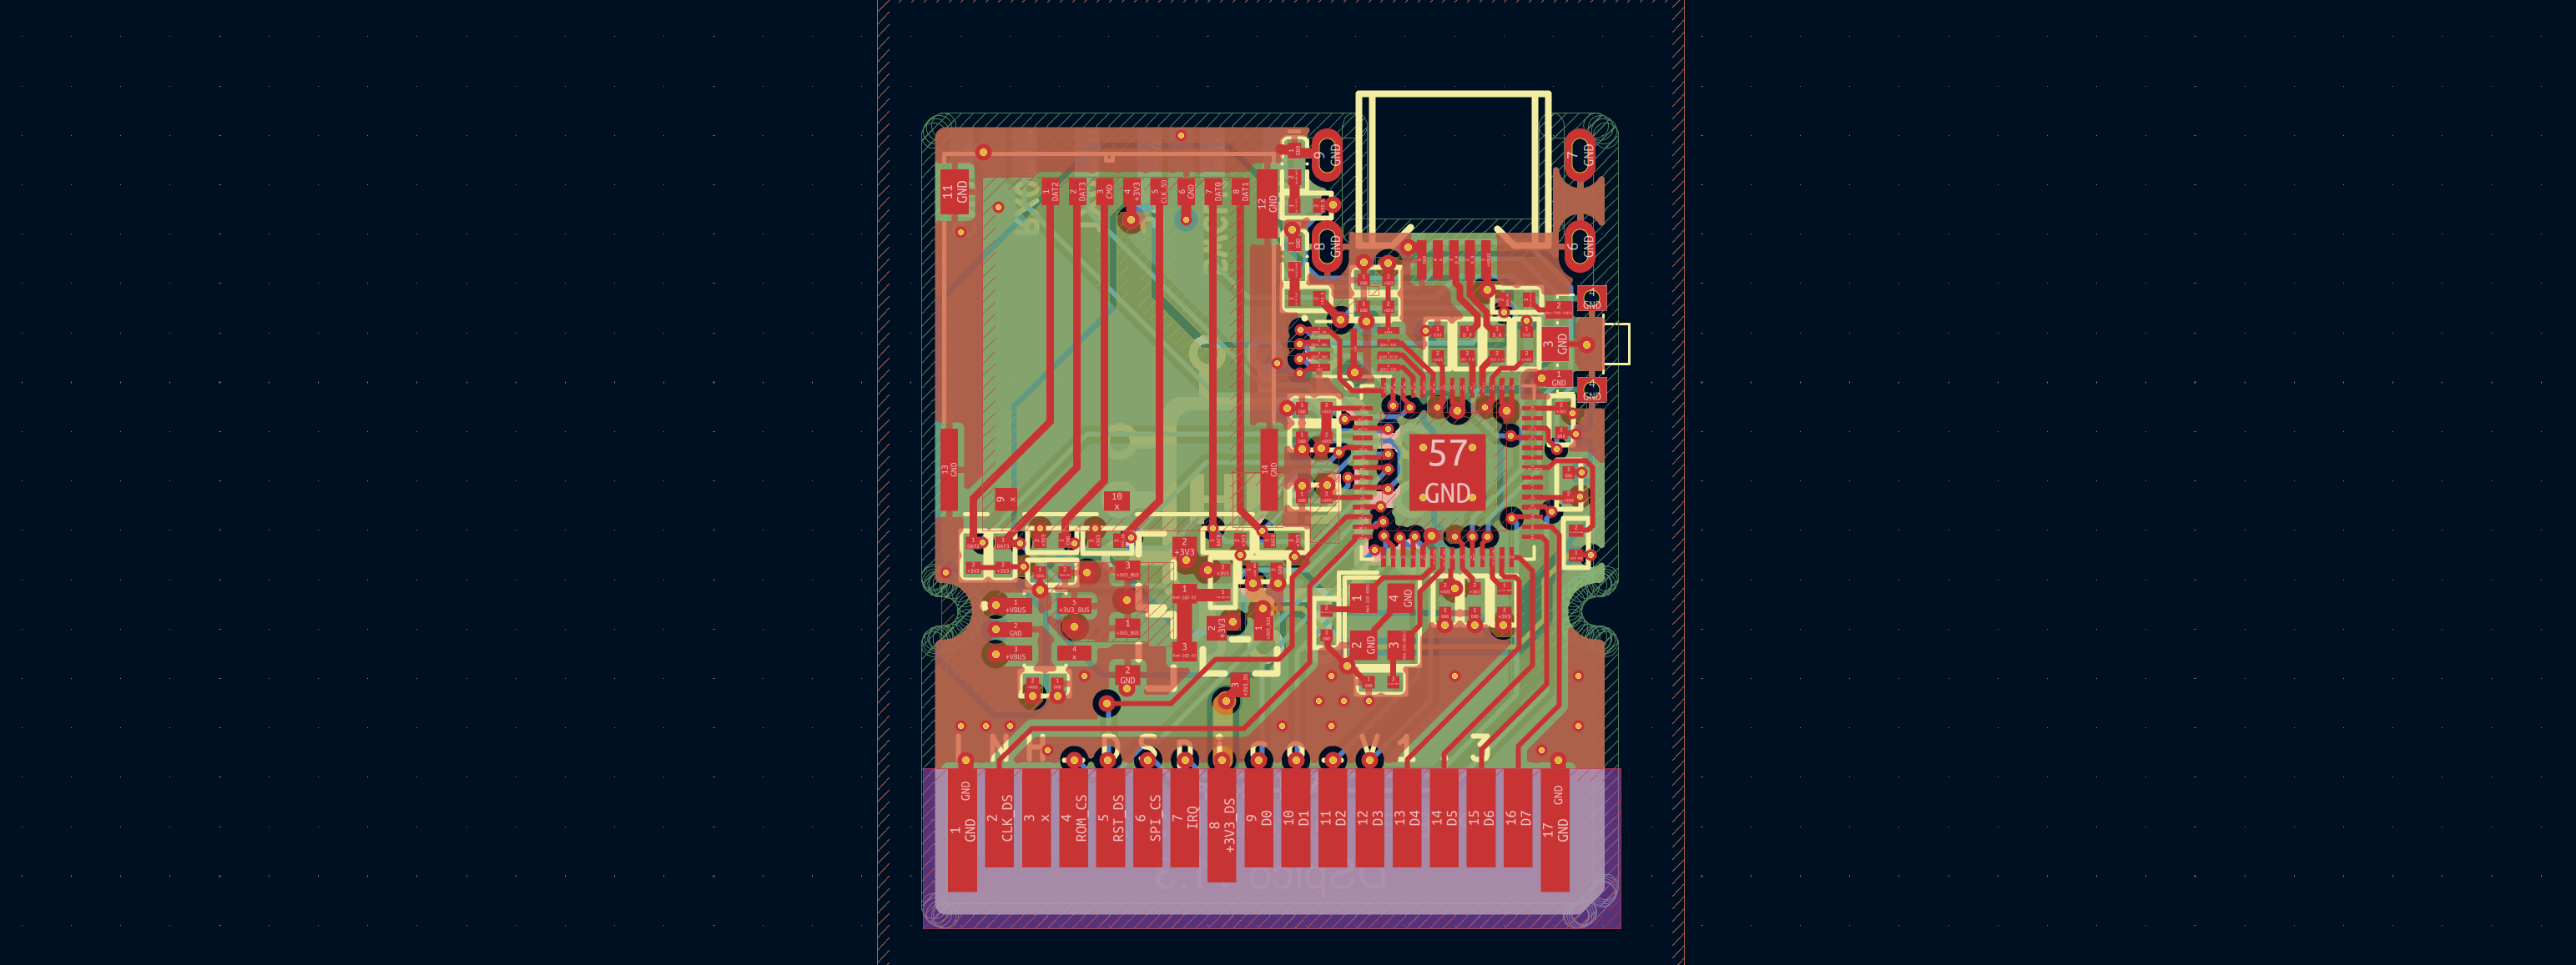 Screenshot of the original PCB designed by LNH-team
As previously said, I started off with this existing design; the steps to take were to first remove the microUSB port and also the microSD card slot. Additionally, I had to come up with a way to program the RP2040 with the firmware. In the end I came up with exposing some big pads in the back that could be easily connected to a USB breakout board. That way I wouldn’t be depending on other boards as some reproduction boards require.
Even though having to make the contacts with separate cables can sound a bit tedious to make for larger productions. A friend of mine showed me this test burner tool that could be used to easily connect the board and program it. Conveniently, I placed the pads at a distance of 2.54mm so it would be easy to find adapters for that connection.
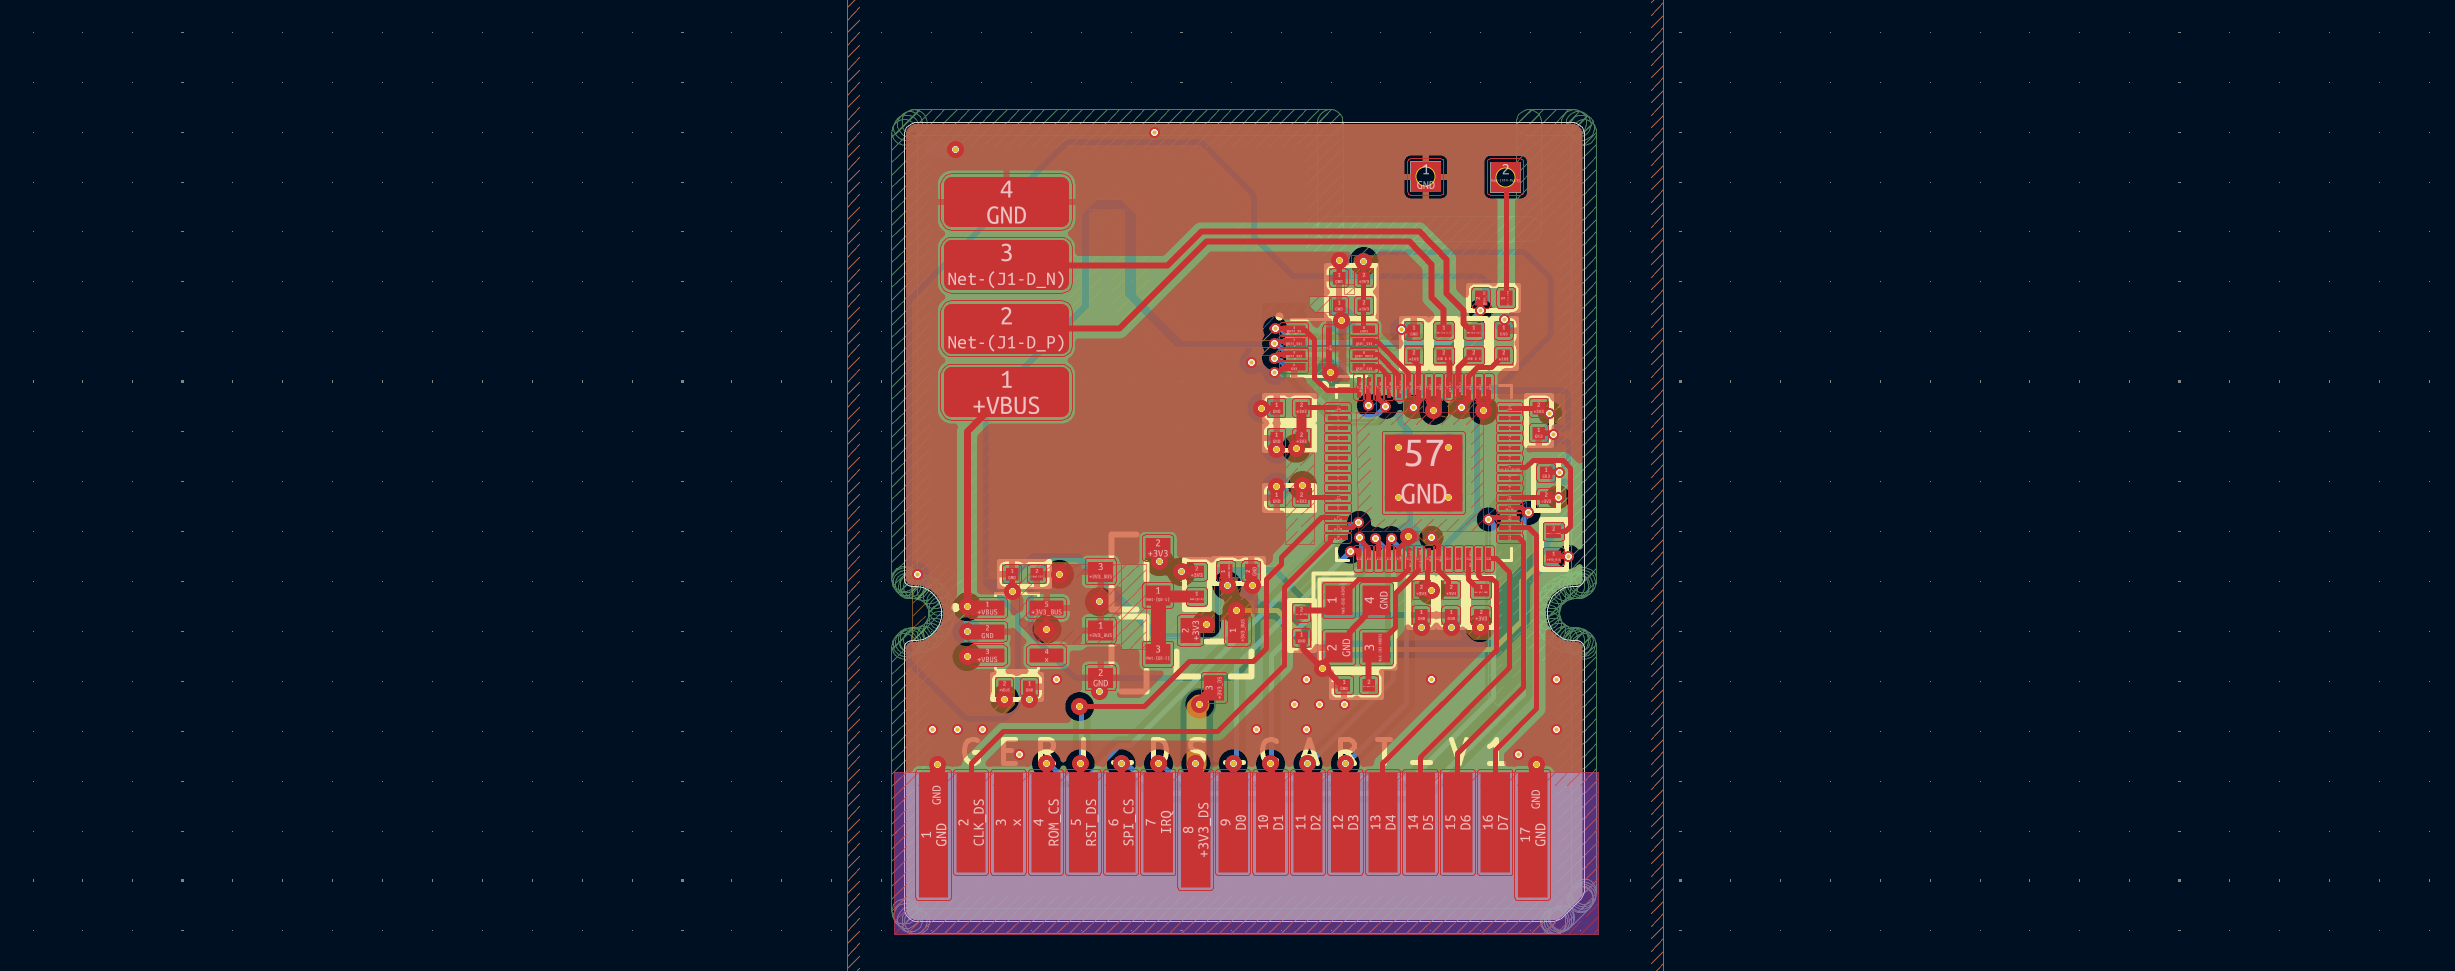 Screenshot of the modified PCB
Additionally, I removed the reset button in order to save me a few cents. In that place I left two holes (top right in the image above) that can be easily bridged in order to reset the RP2040 in case you want to reprogram it.
You can check the source KiCad files used for this board here: GerardGascon/fanzine-ds-hardware.
There’s already a warning in the repository, but I’ll repeat it here. In case you want to try to fit this inside an existing game’s shell, the board lacks the two holes in the middle that make it fit inside a real shell, as well as being a tiny bit taller than an original PCB.
So the current design won’t fit inside a real shell unless you do some sanding to the shell.
Making the cartridge’s software
For this project, I wanted to make a reader for a fanzine that a friend of mine had made a couple of years ago. For that, I tried using various homebrew DS libraries, like libNDS and BlocksDS. For some reason (I suspect the initialization process of the DSpico), the programs kept crashing in both versions (even though they worked fine inside the ROM loader).
In the end, I ended up modifying the original DSpico’s bootloader, which is made with libTWL (an extension of BlocksDS).
I suspect the main issue was due to the initialization code the bootloader executes, but a typical homebrew game doesn’t. A potential solution to this issue could be updating the RP2040 firmware to avoid having to do that initialization process, but I could be wrong with that.
You can check the source code for this fanzine here: GerardGascon/fanzine-ds.
About the ROM Size
First off, the maximum flash memory size that the RP2040 can use is 16MB. But because memory is expensive and the DSpico doesn’t need that much, the DSpico and, by extension, this flash cartridge both have only 2MB onboard. Which leaves us with a very small room for our homebrew projects.
I won’t be getting into too much detail here (you can read more here). But basically, in order to make the ROM detectable by a real Nintendo DS, we have to encrypt it using the Blowfish keys + the WRFU if you want it to run on an unmodified DS. These encryption steps not only add some size to the existing ROM; they also require it to be aligned at 512KB(ish).
By taking the RP2040 firmware size and the space left for the ROM minus the space required for the Blowfish keys, we end up having a limit of about 512KB for our ROM in the 2MB flash cartridge.
Fabrication summary
I have already explained a bit of the making process of the cartridge, but I’d like to leave it here more explicitly for you to easily replicate:
- Grab the files present in GerardGascon/fanzine-ds-hardware and export all the fabrication files from there.
If you are using JLCPCB for the production, they have a guide here + a plugin that easily generates those files for you. - Compile and encrypt the ROM for the cartridge following the compiling information in this repo.
Compile the firmware with your ROM following the guide here.
IMPORTANT: The DSpico has a function to automatically reset if the microSD card isn’t inserted when powered on. This behavior can be disabled by commenting this line present on main.cpp:
1
2
3
4
5
initSd();

// tryRebootToBootsel(); <-- Comment this

pwr_initPowerSaving();
The cool thing about this is that you can initially skip the fabrication of the PCB and test your ROM on an existing DSpico.
Potential improvements
Having done this, we know there’s now the possibility to easily manufacture flash cartridges and create physical releases for homebrew games. But compared to other PCBs for other (older) systems, this PCB would be on the expensive side, between 15 to 20€ depending on the production size, plus also the import duties, which sadly don’t seem to stop increasing.
One potential solution for the cost would be to search for a flash memory compatible with the original DS ROMs’ memory, which I don’t know if they exist. If they existed, we could potentially build a programmer for that memory, and the overall cost could get reduced quite a bit. At the same time, I’m not entirely sure if the WRFU exploit could be done via software; if that’s the case, this solution would only be able to run on modified hardware.
Another improvement could be to try solving the initialization issue where most DS homebrew libraries crashed on startup. If we could find the origin and patch it without modifying those libraries, it would be great, as it would enable us to distribute already existing homebrew without having to recompile it.
Conclusions
I’ve shown you how it’s now possible to make flashable DS cartridges by modifying existing open source projects. Even though there’s still room for improvement, we are at a point where we could start experimenting with them.
Having said that, there are some issues to address. First off, as previously noted, unless you use the WRFU exploit, the ROM can’t be executed on unmodified consoles. Solving this requires you to use the WRFU Tester v0.60 embedded in the firmware, which can’t be legally distributed.
At the same time, there already exist some other copy protection methods that make the ROMs skipping the protection illegal. Like the already-known Nintendo logo in the Game Boy boot, a method where they enforce developers to include the Nintendo logo in their ROM’s contents. As there exists a ton of Game Boy homebrew, one could assume they don’t really care about their existence. Assuming that, they shouldn’t care about the DS’ homebrew and their copy protection violation either, but we never know.
All in all, this has been a nice project to work on, and with good results, it’s true that I still could try solving some issues, but still this serves as a perfectly fine proof of concept.
Finally, I’d like to thank LNH-team for their previous investigation. I don’t want to remove any credit from them, as most, if not all, the merits of this flash cartridge belong to them. If it hadn’t been for their previous work, this project would almost certainly have never come to life. Additionally, I’d like to thank Nanaki, as if her fanzine hadn’t inspired me to start this project, I also wouldn’t have gathered the motivation to bring this cartridge to life.
Hope you liked this write-up, and let me know if this inspires you to make a physical version of your own game :)
Resources:
- DSpico: github.com/LNH-team/dspico
- fanzine-ds: github.com/GerardGascon/fanzine-ds
- fanzine-ds-hardware: github.com/GerardGascon/fanzine-ds-hardware